How to Create an Effective Blogging Schedule that Gets the Work Done
Successful bloggers understand the importance of creating a working system that helps scale and grow the blog. Learn how to create a simple and effective blogging schedule here.
Blogging is an easy way to reach your business goals. The only challenge is that you need a steady stream of content to engage your audience and lead them to take action.
Although you may know how to write awesome blog posts, it can be challenging to create great content consistently.
In order to meet this need, you should create a regular blogging schedule for gathering ideas, creating content, publishing it, and interacting with your readers.
Trust me, this may sound like an easy task but the load only goes up as you grow.
Even the simplest post requires effort and time. This may make you find that keeping your editorial calendar full is so super challenging.
So that’s why a content calendar and a scheduling system becomes so important in the blogging business.
You might also want to check out these other blogging-related blog posts: SEO Friendly Content: A Comprehensive Guide plus SEO Checklist, How to Choose a Blog Name: A Guide for Beginners and What is Personal Brand and why it’s important for bloggers and Entrepreneurs?
What Makes A Blogging Schedule Important
A blog post schedule helps you to stay organized, structured, ahead of your competitors and be at the top of Google search results by consistently publishing great content.
Blogging consistently is a key part of having an effective Search Engine Optimization strategy. So, in order to increase your organic traffic, you must plan out your content first.
We might be at different points in our lives and businesses, so our daily routines might differ a bit. But whatever your stage in the blogging biz is, there are certain key elements every blogger should do regularly in order to earn good money.
You can apply most of these tasks regardless of what revenue streams you’re targeting.
The following are just a few of the big ones:
- Research, write, edit, and publish great content for your audience.
- Create videos that will fit the different media.
- Take, edit, style, and format high-quality photos.
- Design graphics for blogs, social media, and Pinterest.
- Connect and engage with your audience on your blog and on social media.
- Promote your blog/products/services.
- Keep on top of your website’s and business’s administrative tasks.
- Make connections with others in your niche and with brands and affiliates.
- Increase your social media accounts reach, blog traffic, and email list.
Depending on your niche you might have fewer or more tasks to deal with as you grow.
How to Create an Effective Blogging Schedule
There is no one-size-fits-all solution, so come up with a schedule that works just right for you.
Before we begin, be sure to follow us on Pinterest, Facebook, and Instagram, and also sign up for our email list (at the end of this post), so you’ll never miss a post!
Start with Your Goal
What do you hope to achieve with your blog? Are you selling affiliate products directly to your readers? Or is it a long game where you’re trying to build an audience of loyal brand advocates?
It’s important to clarify this goal first because it determines what content you’ll create and how you’ll create it. You’ll need a mix of content that will help you reach this goal, and this has a direct effect on how you structure your blogging time and build your blogging schedule.
Brainstorming
It is a common mistake to rush into writing and publishing blog posts or emails.
Rather, create a list of tasks and brainstorm ideas. Make a plan for your content for the day, week, and month.
How do you want to use your time? Writing new content for your blog? What topics, seasons, holidays are coming? Need to update your website? Update old content? Maybe writing a guest post for another blogger’s site? Improving social media presence. Etc.
Just list these items on a scrap of paper, on your planner, or anywhere you can back to it easily.

Then start coming up with blog post ideas for those topics and set them under evergreen content, seasonal or holiday-specific so you have an idea when they should be published.
It’s also helpful to use keyword research tools like SEMRush or SerpStat to figure out which of these topic ideas align with high search volume, low competition keywords and also to come up with new ideas you hadn’t thought of before.
Simply plug in your topic idea into Keyword Research Tool and it will show you whether the term you entered has ample search volume, as well as related keywords you might want to consider. You might want to try out some variations until you have a list of keywords that make sense for future blog posts.
You can learn more about SEO and Keyword Research right here in this post.
A blogging planner is a great way to brainstorm for blog content, also spreadsheets or Airtable can be very helpful.

Brainstorming is something you can also schedule to do monthly every quarter or every year. Whatever works best for you.
Build a Content Creation and Publishing Schedule
In order to achieve your goal, the question, how often do you need to publish, arises, right? This is important for you to decide to be very realistic to avoid frustration and burnout, and find consistency. If once a week is what you know you can commit with, then start with that.
Content Creation Plan
Once you decided on your post frequency then create your blogging schedule by working backward, considering all that you have to do.
For example, if you want to publish one post per week, you’ll need to decide which day you’ll publish on, and then when you will perform each step necessary to meet your publishing deadline.
You might decide to post every Friday. So, this means you need to research and outline Wednesday, write on Thursday, and then edit and schedule posts to be published on Friday. Through experience, you might determine that you need an hour a day Wednesday through Friday.

This was just to give an example. You know your timings better so just be realistic and set your times and dates that will give you plenty of time to achieve your goals
By this step, you will have a list of potential blog post ideas based on your “brainstorming”, keyword research, and competitor research. All that’s left is to figure out a blog schedule you’ll actually follow.
Because you did the keyword research beforehand, you already know that the topics you have selected have plenty of search volume, so you won’t waste your time writing articles that have no chance of generating organic traffic. Moreover, you’ll know that many of your articles will be of interest to your readers.
Publishing Schedule Plan
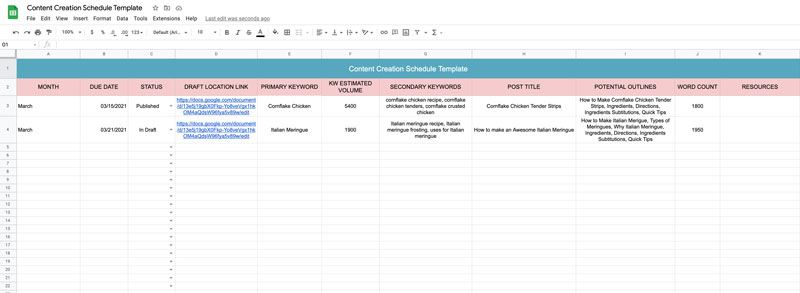
Whether you use a blog planner or a simple Spreadsheet, you can start organizing your blog calendar for content creation and start scheduling.
Create a column for each of these labels: Month, Due Date, Status, Focus Keyword, Search Volume, Competition, Secondary Keyword(s), Title, Word Count, Internal Links, and Resources.
Enter the keywords the previous step helped you identify in the “Focus Keyword” column. For each of these keywords, complete the “Search Volume” and “Competition” columns.
The “Secondary Keyword(s)” column should contain any additional keywords that you want to include for an article that is closely aligned with the Focus Keyword but don’t form the primary focus. These can be found in the suggested ideas from google search and Pinterest suggested ideas.
To help you come up with an article “Title” that’s better than what’s already ranking, we suggest doing a Google search for your Focus Keyword first.
Any other articles/pages on your website you wish to link to within your new article should go in the “Internal Links” column.
Usually, the “Word Count” should be similar to the top articles that rank for your Focus Keyword, but there are no hard and fast rules.
The “Resources” section includes a variety of things you may want to reference, such as an ebook related to your article, a freebie or content upgrade that will help your reader, or a similar guide you would like to use in your research.
The “Month”, “Due Date,” and “Status” columns are all meant to help you stay organized and keep track of your blogging editorial calendar.
Doing all this will help you give your blogging routine structure and help you stay organized and tackle each task.
I’m sharing a FREE Content creation Schedule Template for both Spreadsheet and Airtable.
* Remember to make a copy for yourself before editing.
Snag the FREE Airtable Content creation Schedule Template
Snag the FREE Spreadsheet Content creation Schedule Template
Daily Blogging Time or Weekly Chunks
Once you have your content organized and scheduled you need to come up with a strategy that will help you achieve those goals and deadlines. There are many ways to do this and it’s totally up to you which one works best.
What works for me and might work better for you is to set aside time each week for all your blogging tasks. This might look different for you depending on what you blog about.
For example. I usually block full 1-2 days to work on a single project. As a DIYer, researching, creating, taking photos/videos, editing, writing, and publishing take up a lot of my time. Plus I run 2 businesses LOL.
But if you blog about less complex topics you might decide to publish twice a week, once on Monday and once on Thursday, you might set aside Friday afternoon for writing and finishing two posts. This might work better if you’re unable to set aside a little time each day.
Another example, if you decide to spend a 4-hour stretch each Wednesday morning for blogging, you might find that you’re running out of gas by the 3rd hour. This tells you that you should break up the time into smaller chunks on separate days.
If you choose half an hour a day, you might find it’s not enough to meet your publishing deadlines. If so, bump it up to 45 minutes and see if that helps.
Don’t forget to include other steps in addition to writing. If you’re including videos in your mix, you need video production time. If you accept guest posts, youíll need time to find and review guest bloggers. Always set aside time for editing your posts before hitting publish.
This comes down to what works for you. You need to be very clear and very realistic. If it works for you to set 2-4 hours a day, so be it, if it’s one full day, then that’s great. What’s important is that you set those days and times and make it happen.
I recommend not just scheduling when you should post a specific blog post but every step too. Like on Tuesday, create DIY, take photos and video, Thursday, edit and write.
Once you have your blogging schedule ready to go, as your task dates approach, gather your resources and supplies and get ready to roll your sleeves and start working.
Start Blogging and Track Your Progress
I always recommend my blogger friends to never write their blog posts directly on WordPress or whatever platform they use (nor publish that same day). I always recommend writing the first drafts on a Word Document, Google Doc, etc first.
Firstly because you always get an offsite backup of your content and second because you will most likely need to make edits, add images, optimize sections, etc. before you are ready to publish.
I love using Google Docs for my blog post drafts. It allows me to save my work and make edits as many times as I need before uploading it to my blog. Also, it makes it simple to upload my work to my WordPress website by copying and pasting my content into the content editor.

I also love using Topic App that helps me fine-tune, optimize my work, adjust the formatting and add relevant topic/words/phrases to my content that I hadn’t thought of covering so I can create awesome content that will serve my target audience.
Always remember to add some pretty images well-optimized, and relevant to your website. If you don’t take or create your own you can always use Styled Stock photos.
Once your article is ready hit “Publish” but not without making sure you added a catchy post title, a meta description, internal links to other posts or pages, optimizing your image file sizes, alt text, and file names, Included external links to relevant articles, a “featured image”, and lastly, checking your article for spelling and grammar errors.
In the last step, share your article with the world and engage with followers who share, like, and comment on your article. Although it may be tempting to just click “Publish” and leave it at that, it’s a good idea to share your content across multiple channels in order to maximize your traffic.
Now, you just need to keep track of how much your blog grows as your blog on a regular basis and stay on track and motivated.
Final Thoughts
Although you should take your time to create a blogging schedule that suits you, it takes some trial and error to understand what truly works. Don’t spend too much time planning. Create a schedule and implement it, and then see whether it helps you achieve your goal or not, tweak it until it works and stick with it.
Create a plan and get started, then refine as necessary. Remember that the goal is to create a plan that allows you to turn out high-quality work consistently in a way that’s easy for you.
Do you want to learn more about blogging? Check out these blog posts: