How to Optimize Images for Faster Websites (Without Sacrificing Quality)
If you run a blog — especially in the creative, DIY, craft, or food space — images are not optional. They’re the experience.
But they’re also one of the biggest reasons websites feel slow.

This post contains affiliate links. I earn a commission from qualified purchases. Please read our Privacy policy here.
Over the years I’ve audited so many blogger sites, and almost every time performance issues trace back to the same thing: oversized, uncompressed images.
The good news? This is fixable. And you don’t need to be a developer to do it right.
Let’s walk through what actually matters today when it comes to image optimization.
Why Image Optimization Still Matters (More Than Ever)
Have you ever tested your site speed and size on site speed tools? There are many but the most common are Google SiteSpeed, Pingdom and GTMetrix. These sites will tell you your site’s size in KB, MB, etc, your loading time and how many requests it makes.
Google doesn’t just look at your content. It measures how your site performs.
One of the biggest metrics affecting performance is how quickly your main content loads — especially your largest image above the fold. That’s tied directly to Core Web Vitals and Largest Contentful Paint (LCP).
If your hero image is 3MB straight from your camera, your page is already starting at a disadvantage.
Image optimization affects:
- Page speed
- User experience
- Mobile performance
- Hosting resource usage
- Search visibility
And in visual niches like ours, it makes an even bigger difference because we use a lot of images.
So let’s do it properly.
What Image Optimization Actually Means Today
Image optimization isn’t just “make it smaller.”
It means:
- Uploading the right dimensions
- Using modern file formats
- Compressing without visible quality loss
- Letting WordPress serve responsive sizes
- Making sure images are SEO-friendly
If you handle those five things, you’re ahead of most sites.
1. Resize Before You Upload
This is still the biggest mistake I see.
Uploading a 5000px wide image when your content column is 800px wide makes no sense. Your theme will never display it at that size.
But there’s an important detail here.
Modern screens — Retina and other high-density displays — render images more sharply when higher-resolution versions are available. So uploading at exactly 800px isn’t ideal either.
Here’s the practical approach.
If your content column is 800px wide, a true 2x Retina version would be about 1600px wide.
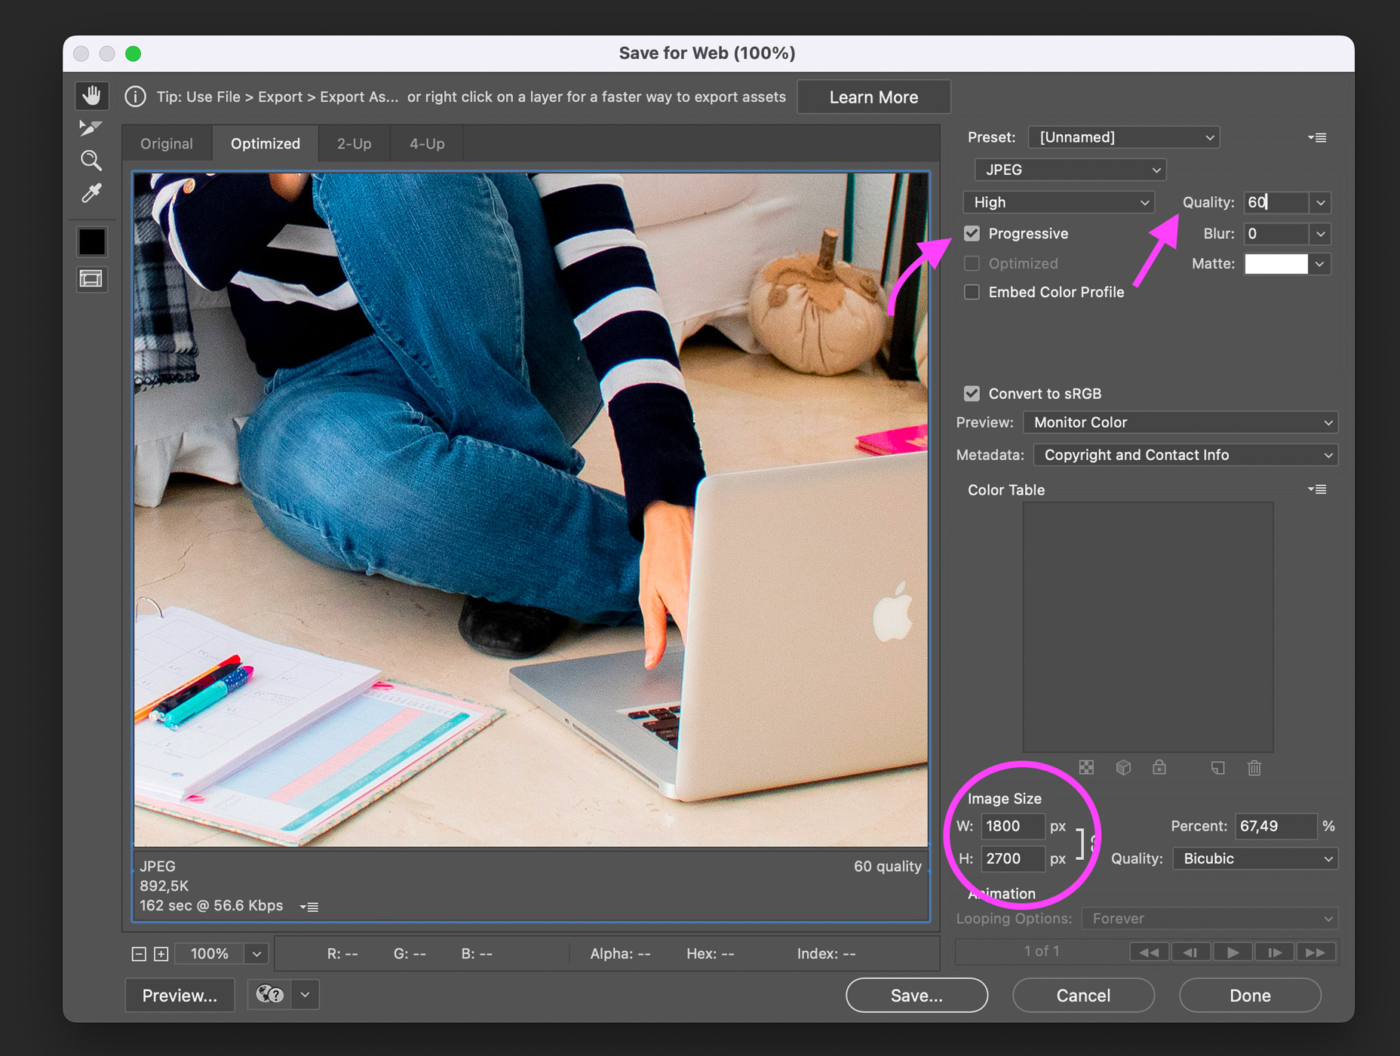
That means uploading somewhere between 1700px and 2000px gives you:
- Sharp images on high-density screens
- Enough resolution if your layout grows slightly
- Controlled performance when properly compressed
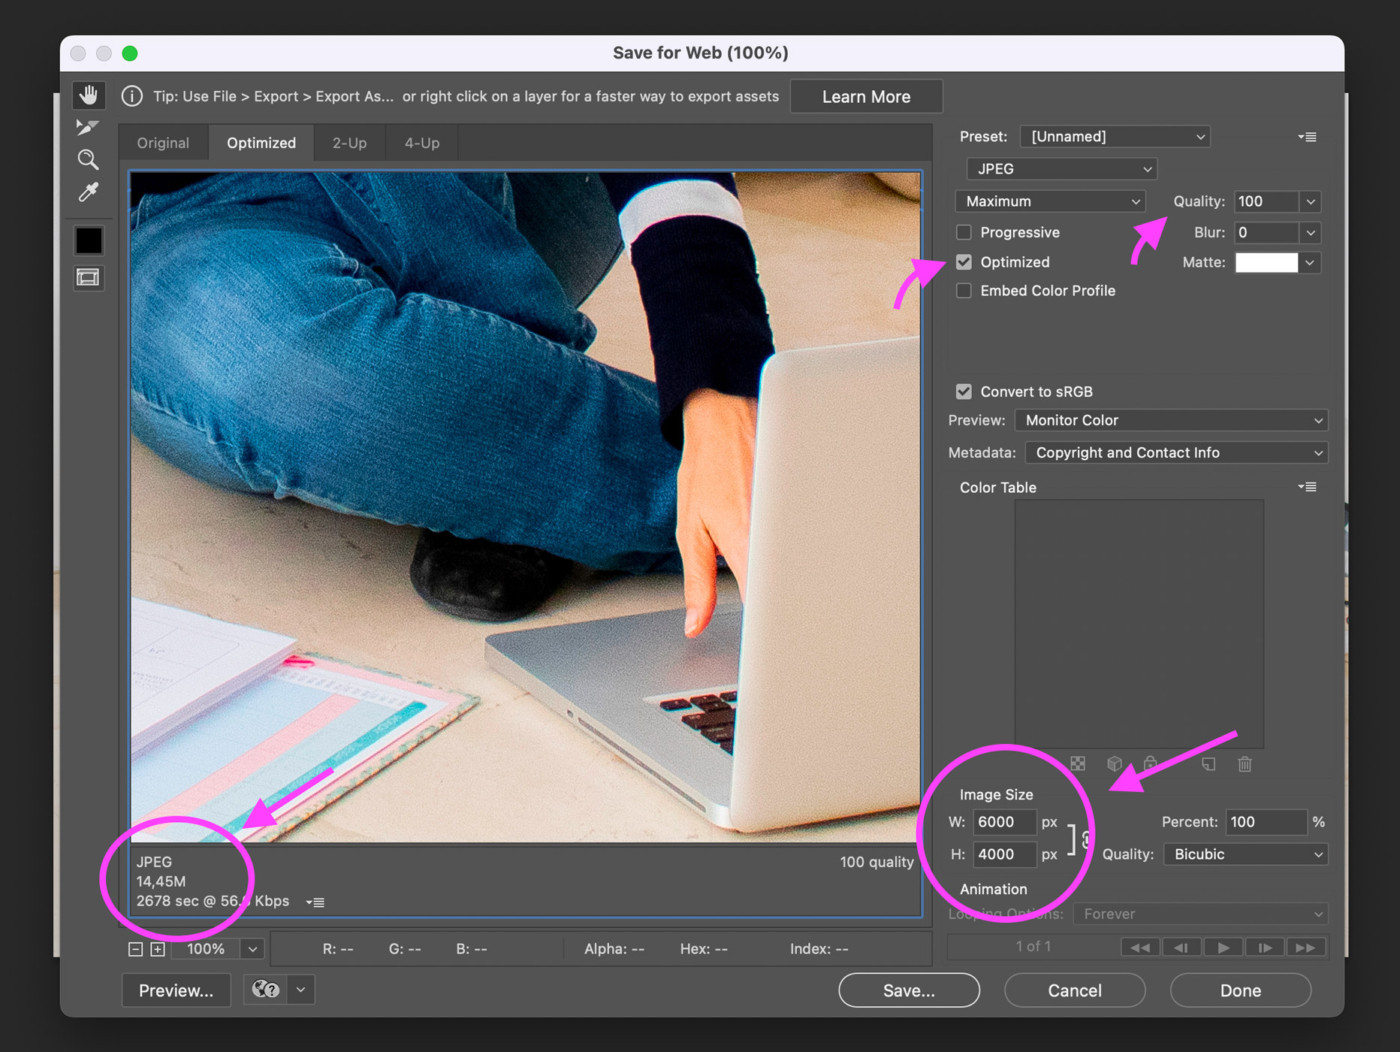
You don’t need to upload original camera files, and you should’t. You don’t need 4000px or 6000px “just in case.” You need intentional sizing.
WordPress already generates multiple image sizes and uses responsive image markup (srcset) to serve the most appropriate version depending on the device. Your job is simply to upload a well-sized base image that allows the system to do its job.
The real metric that matters isn’t just pixel width — it’s final file size.
An 1800px WebP image at 150–250KB is excellent.
An 1800px JPEG at 1MB is not.
Retina clarity doesn’t require oversized files. It requires a balance between resolution and compression.
2. Use the Right File Format
This has changed over the years.
Today, the preferred formats are:
- WebP (recommended)
- AVIF (even smaller, but depends on hosting support)
- JPEG (fallback for photos)
- PNG (only when transparency is needed)
If you’re uploading large photographic PNGs, that’s usually a mistake. They’re heavier than JPEG or WebP.
Most image optimization plugins can automatically convert your images to WebP and serve that version when supported. That alone can reduce file size significantly.
3. Compress Smartly (Without Ruining Quality)
Compression is where people get nervous.
But here’s the truth: most images look visually identical between 60% and 80% quality.
You don’t need 100% quality for web display.
When exporting from Photoshop (or similar), test once. Lower the quality gradually until you begin to notice distortion. Then go slightly back up.
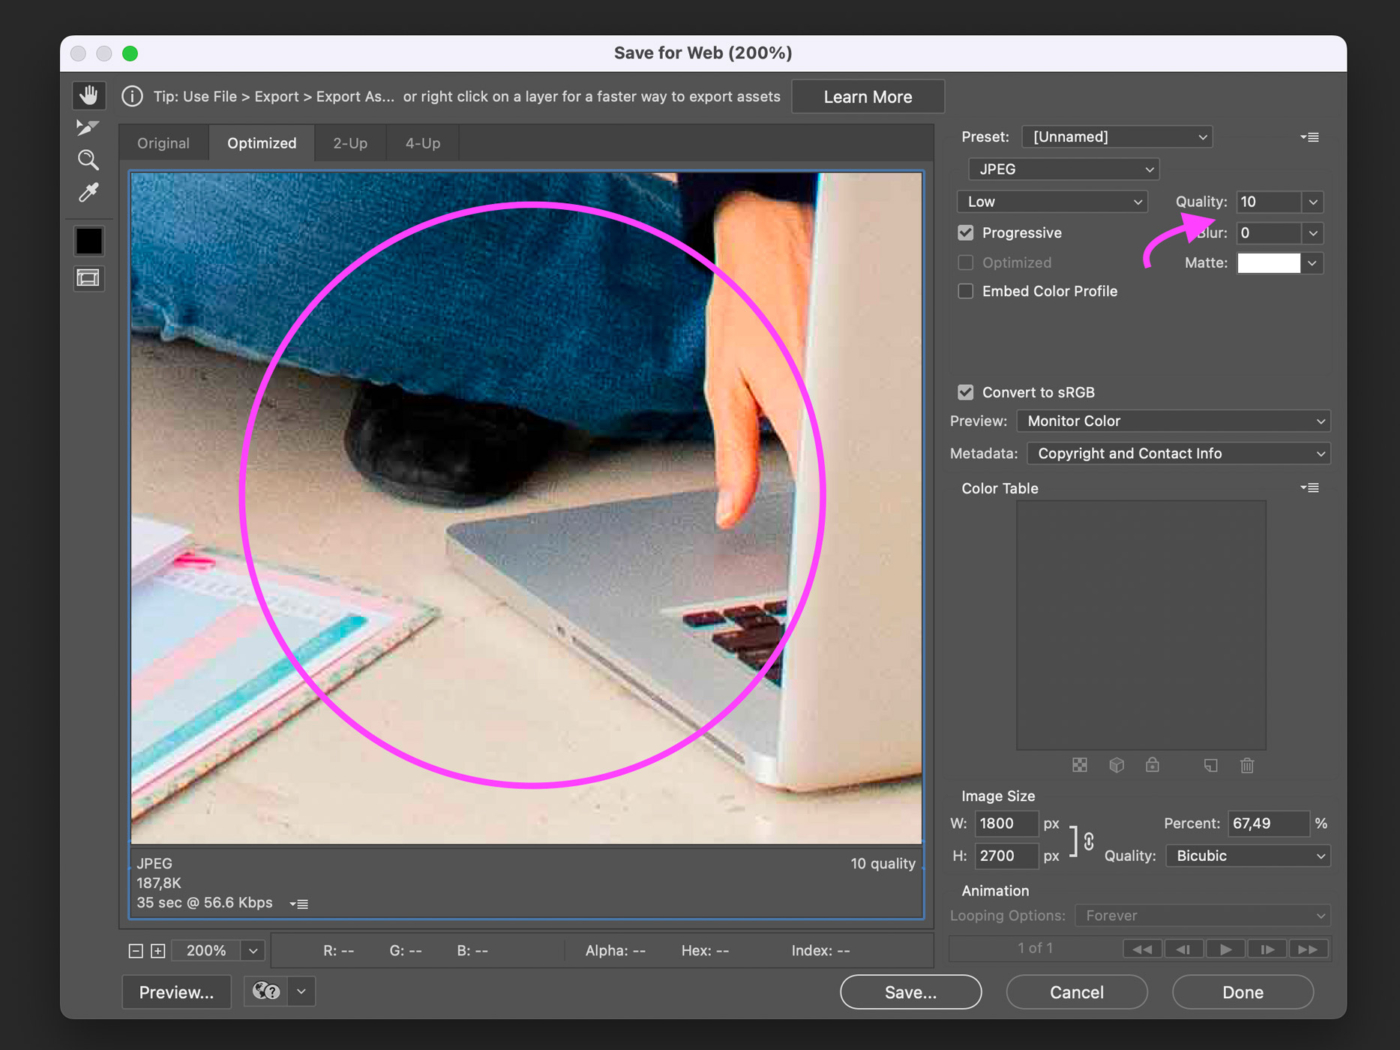
For most of my images, that sweet spot sits around 60%.
After that, I still run them through an optimization plugin to squeeze out extra savings.
The key is this: if someone has to zoom in at 300% to notice a difference, it’s not a real difference.
4. Let WordPress Do Its Job (Responsive Images)
Modern WordPress automatically creates multiple image sizes when you upload a file.

It then serves different sizes depending on the user’s screen.
That means:
- Mobile devices get smaller images
- Large screens get appropriately scaled versions
- You don’t need to manually create separate versions
Where bloggers go wrong is uploading something massive and assuming WordPress will fix it.
WordPress can scale down. It cannot make your original lighter if you uploaded it oversized and uncompressed.
Start with a reasonable file. Then let the system handle responsiveness.
5. Use an Image Optimization Plugin
Even if you resize and compress before uploading, a plugin adds an extra layer of optimization.
Look for one that:
- Compresses existing images in bulk
- Converts to WebP automatically
- Keeps backups of originals
- Doesn’t overload your server
I’ve used ShortPixel for years and it has worked well for me, but there are solid alternatives like Imagify and others. What matters is choosing one and actually using it consistently.
Don’t install five. Pick one and configure it properly.
6. Native Lazy Loading (No Extra Plugin Needed)
WordPress includes native lazy loading by default.
This means images below the visible screen area don’t load until the user scrolls.
Most performance plugins enhance this behavior further.
You don’t need a separate “lazy load” plugin unless you have very specific use cases or need more features.
If you’re stacking performance plugins without understanding what each one does, you may actually create conflicts.
Keep it simple.
7. Don’t Forget Image SEO
Speed matters. But search visibility does too.
Before uploading:
- Rename your file descriptively (no IMG_4829.jpg)
- Write proper alt text that describes the image
- Don’t stuff keywords
- Leave alt empty only if the image is purely decorative
Alt text is primarily for accessibility. It helps screen readers describe images to users who cannot see them.
If you write alt text naturally and descriptively, you’ll support both accessibility and image search visibility without overthinking it.
8. Consider a CDN
A CDN (Content Delivery Network) serves your site’s assets from servers closer to your visitor’s geographic location.
That reduces latency and takes load off your hosting server.
I use Cloudflare, which integrates easily and also adds security and caching benefits.
If you’re getting traffic from multiple countries, a CDN is not optional. It’s infrastructure.
My final thoughts
Every image adds weight to your page.
You don’t need to sacrifice quality. You need to be intentional.
Resize before uploading.
Use modern formats.
Compress smartly.
Let WordPress handle responsiveness.
Optimize consistently.
When done properly, image optimization improves performance without compromising how your site looks.
And if your site feels slow right now, start with your images. It’s often the quickest win.
Need help optimizing your website for better performance?
I can help you, let’s Talk!
Frequently Asked Questions
The best image size depends on your content column width. Start by checking your theme’s maximum content width. Then upload images at about 1.5x to 2x that width to support high-resolution screens. For example, if your column is 834px wide, uploading between 1700px and 2000px is usually enough. Larger than that is rarely necessary unless you offer zoom functionality. The goal is to balance clarity with performance.
Yes — but intentionally. Retina screens typically display images at twice the pixel density. That means if your content column is 800px wide, a 1600px image will look sharp on 2x displays. You don’t need to upload 4000px+ images. Upload a properly compressed image that supports 2x density, and let WordPress handle responsive scaling.
In most cases, yes. WebP images are significantly smaller than JPEG or PNG while maintaining similar visual quality. For photos, WebP is usually the best choice. PNG should be reserved for images that require transparency. Most modern optimization plugins can automatically convert your images to WebP and serve them when supported.
Not usually. WordPress includes native lazy loading by default. Many performance plugins also enhance it. Unless you have a very specific setup, installing a separate lazy load plugin is unnecessary and can sometimes cause conflicts if not setup properly.
Yes — indirectly.Large, unoptimized images slow down your page. Slower pages negatively impact user experience and Core Web Vitals metrics, which are ranking factors. Image optimization alone won’t guarantee higher rankings, but ignoring it can absolutely hold your site back.
More Blogging Posts To Read
If you enjoyed learning How to Optimize Images for Faster Websites (Without Sacrificing Quality), you might also love these other blogging-related articles too:
- What Google Considers High-Quality Content. Google’s Quality Guidelines Explained.
- What Google Actually Says about Images and SEO
- What Content Intent Actually Means for Recipe and DIY Bloggers
- Blog Quality, EEAT, and SEO Audits: What Actually Matters
Don’t forget to share and save this post!