Mastering GA4: A Beginner’s Guide to Your Blog’s Analytics
Learn how to set up and mastering GA4 for your blog! Our beginner’s guide breaks down analytics to help you grow traffic and boost engagement.
Let’s be honest: Google Analytics 4 (GA4) can be intimidating, especially if you’re not a numbers person. But understanding your blog’s analytics is crucial if you want to grow your traffic, make informed decisions, and ultimately, turn your blog into a thriving business.
Whether you’re a new blogger or someone who has been at this for years, this guide is here to break down GA4 in a way that makes sense—without all the jargon.

What’s GA4?
GA4 is a tool on the internet that tells people what visitors are doing on their websites or apps. Imagine you have a special notebook that keeps track of every time someone plays in your park or comes to your house.
It’s a tool that shows numbers and graphs to help website owners make decisions and improve their pages to be more converting or helpful. It also helps people understand where visitors come from and how they discovered them.
In simple terms, GA4 is a special tool on the internet that helps website owners understand who visits their site and improve their pages to make them more exciting. So everyone will be pleased and have a special experience on the internet.
This tool helps bloggers and online business owners figure out how others visit their websites or use their apps. It is like a detective that watches people and tells website owners about their interests and actions on their webpages.
This tool helps website owners make wise choices and enhance their site to make it more enjoyable and helpful for visitors.
Why GA4 Matters for Bloggers
Google Analytics has always been a powerful tool, but GA4 takes things to a new level. With more emphasis on user-centric data, GA4 gives you a better understanding of how visitors interact with your content across different devices and platforms.
Unlike Universal Analytics, GA4 is designed to give you a more holistic view of your audience, tracking their journey from start to finish. This is crucial for bloggers who want to create content that resonates and converts.
Why Tracking Your Website
A tracking tool that helps you understand the people who come to your blog or website, gives you valuable insights about your visitors. Here’s why it’s important:
- Understand your visitors: it helps you find out the number of people who visit your blog or website every day.
- Find out what they like: it helps you identify the articles on your blog or products on your website that are the most popular. You can find out which pages of your blog are read the most.
- Know where they come from: It’s like having a special map that tells you where your visitors come from, like their city or country. You can find out how many people from different places visit your blog or store.
- Learn how they find you: a tracking tool can show you the ways people discover your blog or store. You can tell if someone discovered you by looking you up online or if they found you through a social network like Facebook or Instagram.
- Improve your blog or business: Use this amazing information to improve your blog or website. You can make more things that people like, like content or product and services, so that everyone will be keep coming for more.
In simple words, it’s important to use a tracking tool like Google Analytics 4 because it helps you understand your website visitors better. It tells you what they like, where they come from, and how they find your website. With this information, you can improve and expand your blog or business to make it more enjoyable and successful.

Setting Up GA4: The Basics
Before you can start analyzing data, you need to set up GA4 for your blog. Here’s how:
1. Create a Google Analytics Account:
- If you don’t have a Google Analytics account yet, you’ll need to create one. Visit the Google Analytics website and sign up with your Google account.
- Click the “Get Started for Free” or “Sign Up” button to create an account if you don’t already have a Google Analytics account.
- Sign in with your existing Google account or create a new one.
2. Set Up a New Property in GA4:
- Once logged in, click on the “Admin” gear icon at the bottom left corner of your dashboard. Under the “Property” column, click “Create Property.”
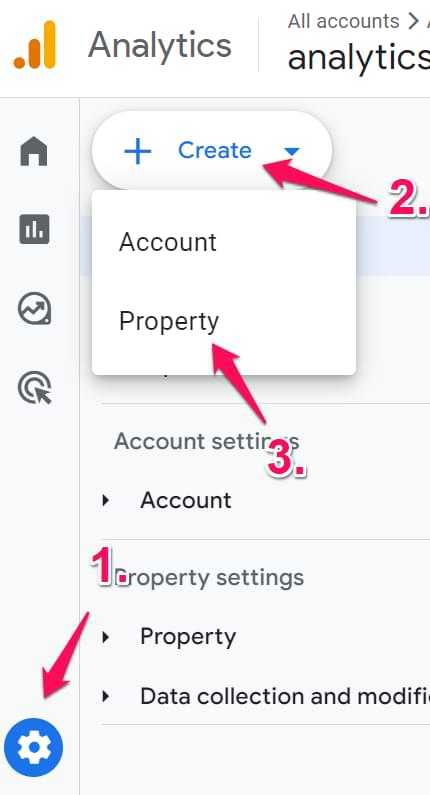
- Choose GA4 as your property type. Google will guide you through the setup process, including entering your website’s details.
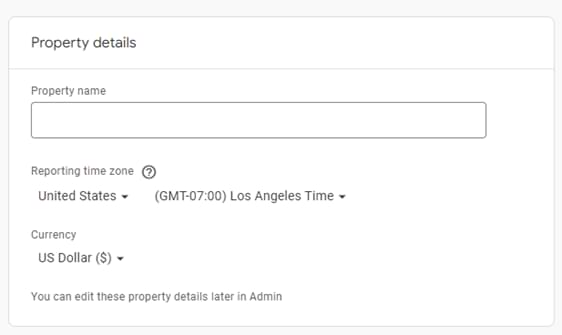
Fill in the required information, such as the property name, data stream name (if applicable), and other relevant details.
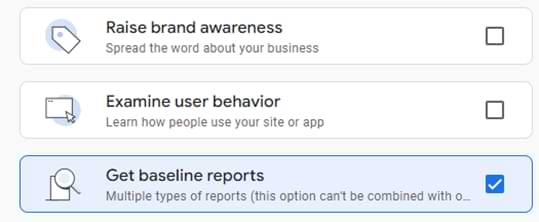
- Then press Next, and answer several questions. Then you will need to select your business objectives. Based on these choices, the reports that you will have in the interface will change too. To make things simpler right now, select “Get baseline reports”.
- Accept the terms and conditions and click “Next” to create the GA4 property.
- The next thing to do is to set up your first data stream. This is where events will be sent to your Google Analytics 4 property. A property can have more than one data source. For instance, there are three places on the internet: one for the web, one for Android apps, and one for iOS apps. In this blog post, I will talk about a Web video. Choose it.
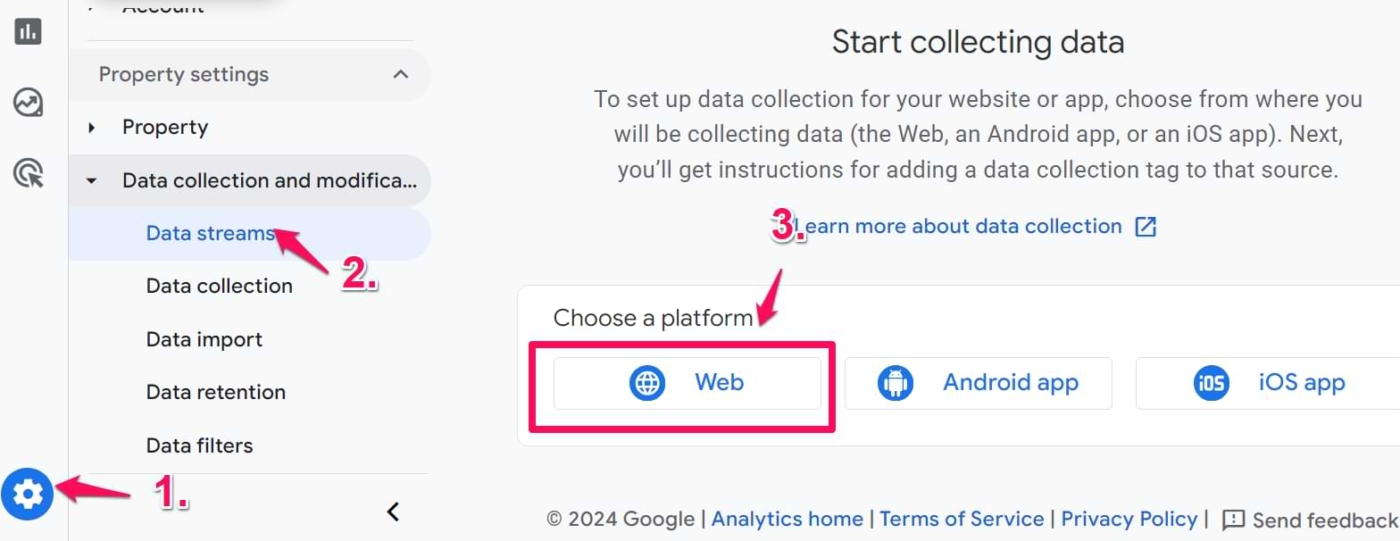
- Then, type your website’s URL (for example, https://www.mywebsite.com) Note that HTTPS is already selected. Enter the name of your website (your domain).
- In Google Analytics 4, you can turn on or off Enhanced Measurement. It is designed to help marketers get as many events in the reports as possible without having to work with developers or configure them in Google Tag Manager.
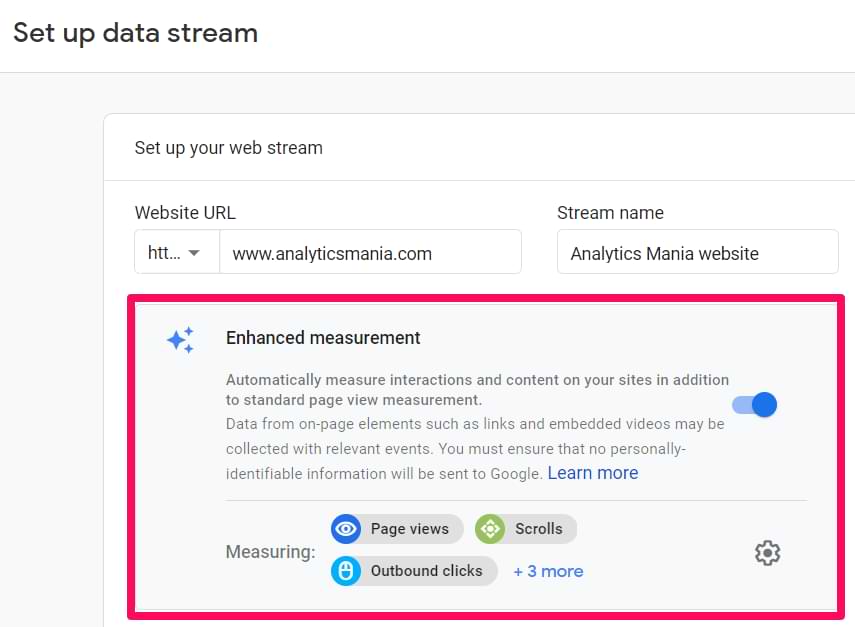
By default, this feature is turned on and will keep track of these things:
- Page view (event name: page_view)
- Scroll (event name: scroll)
- Outbound link click (event name: click with the parameter outbound: true)
- Site search (event name: view_search_results)
- Video Engagement (events: video_start, video_progress, video_complete)
- File Download (event name: file_download)
- Form events (form_start, form_submit)
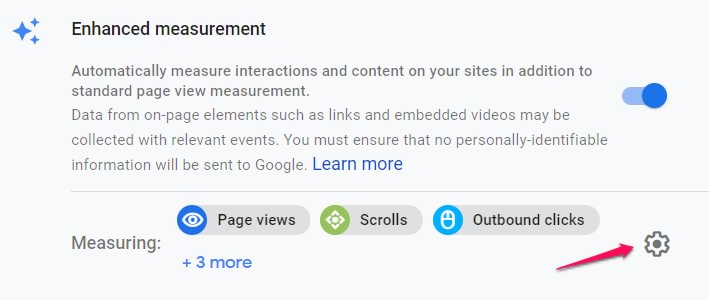
Press the Create Stream button when you’re ready.
3. Install the GA4 Tracking Code:
After setting up your GA4 property, Google will provide you with a tracking code and a settings tag. This code needs to be added to your website so GA4 can start collecting data.
If you’re using WordPress, you can easily add the tracking code through your theme’s header.php file, or better yet, use a plugin like “Insert Headers and Footers or WP Code” to do it without touching any code.
There are plugins for this without using any code such as GA4WP but these usually add a lot more code and load than necessary so I prefer using the Insert Headers and Footers now called WP Code Snippets.
In GA4 Admin > Data Streams, select your Web Data Stream. Then click View tag instructions.
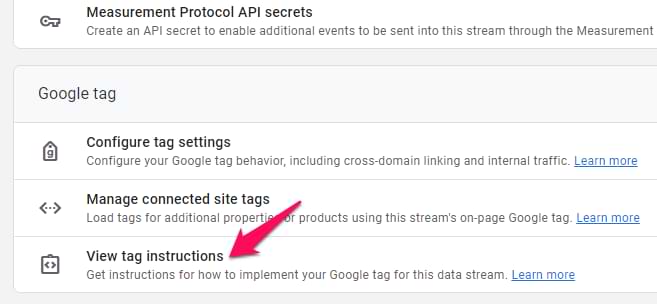
Then select Install manually and copy the tracking code shown in the pop-up box or on the page.
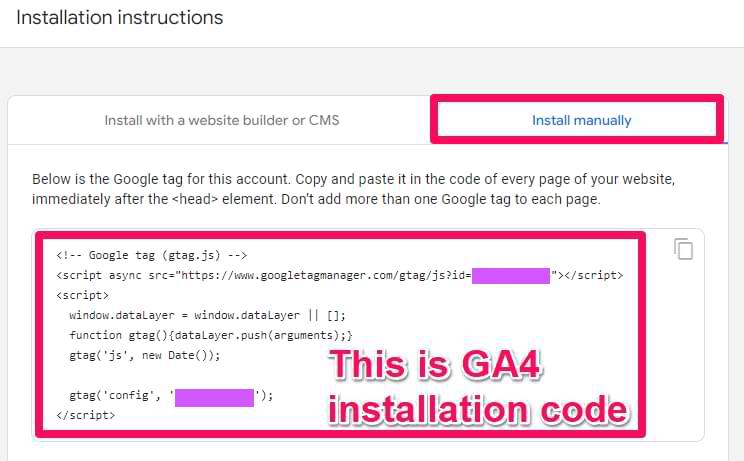
Add the tracking code on every page of your website before the closing </head> tag. Make sure the code is valid and is on all pages where you want to track GA4 data (In the case of WP this is done automatically when you use a plugin or manually add it to the header.php file).
Check if the tracking code installation is successful using the “Google Analytics Debugger” extension for Chrome or your browser’s “View Source Code” tool (mouse right-click anywhere on the page) to make sure there are no errors.
Once you see the source code click control F or command F on Mac (page search) and type “gtag” and hit enter. You should see highlighted the tracking code.
Verify Data Collection:
Once your tracking code is installed, please wait a few hours for Google Analytics to start collecting data then return to your GA4 dashboard and verify that data is being collected. You can do this by visiting your blog and checking the “Real-Time” report in GA4 to see if your visit appears.
Go to the “Reports” section to verify that the data collection is working correctly.
Explore the different reports and metrics available to analyze your website traffic.
Congratulations! You have now created and installed Google Analytics 4 on your website and you are ready to start tracking and analyzing the behavior of your users.
Remember that the installation process may vary slightly depending on the CMS you are using (eg WordPress) or if you are working with a web developer. If you’re having difficulties, you can always refer to the official Google Analytics documentation or search for tutorials specific to your platform or situation.
The GA4 dashboard might look overwhelming at first, but it’s designed to be user-friendly once you know where to look. Here’s a quick overview of the key sections:
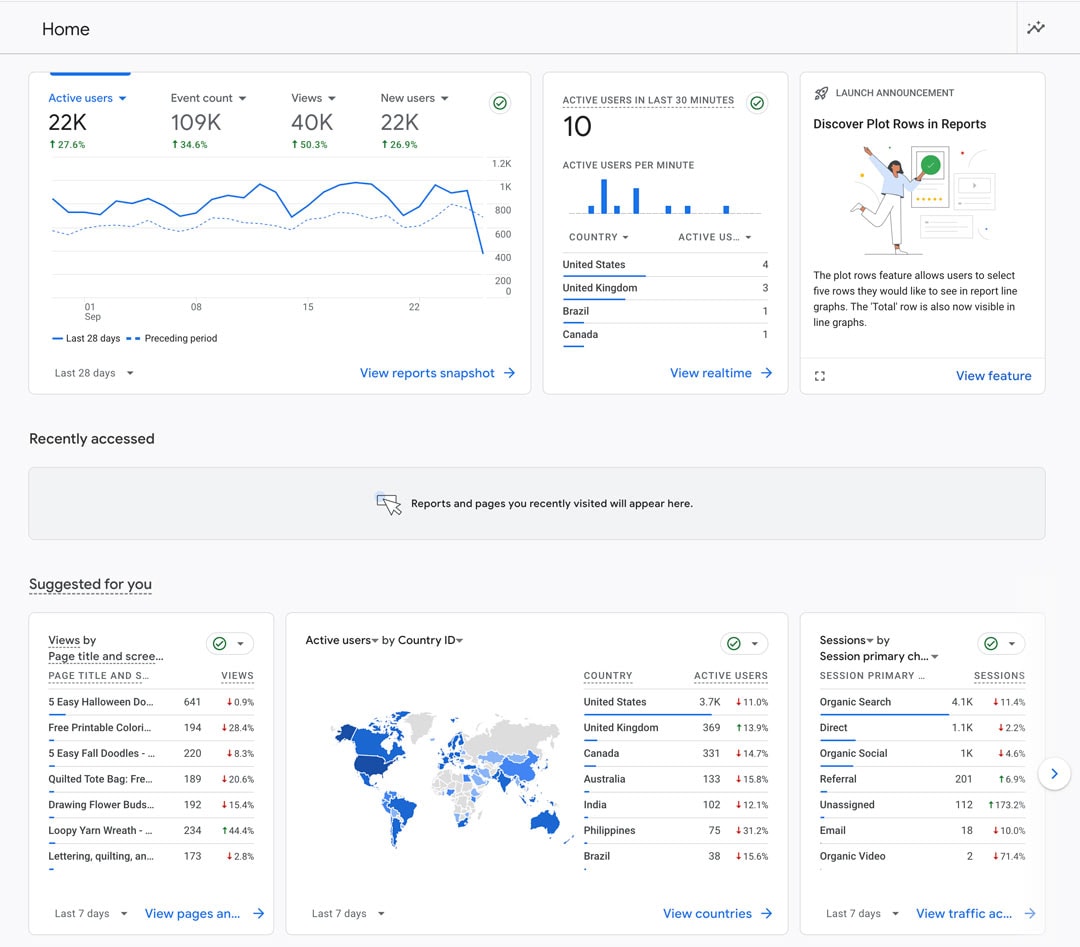
- Home:
The “Home” tab gives you an overview of your website’s performance, including metrics like user count, sessions, engagement, and revenue (if applicable). This is your go-to place for a quick snapshot of how your blog is doing.
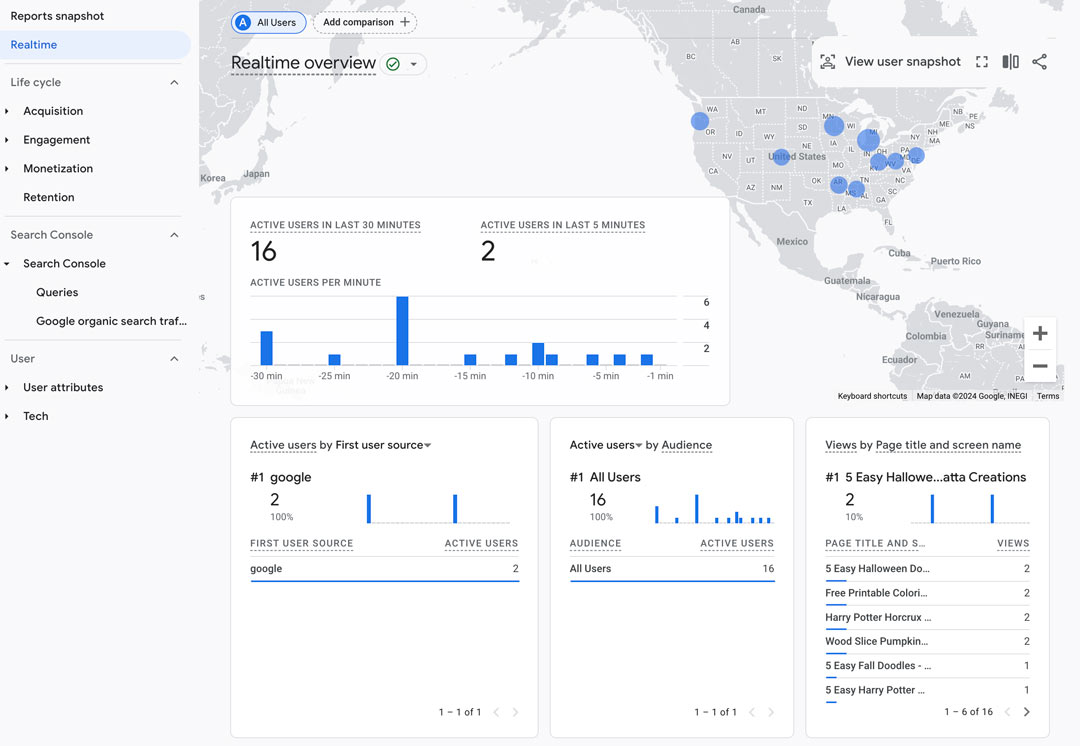
- Real-Time:
The “Real-Time” tab shows you what’s happening on your blog right now. You can see how many people are on your site, which pages they’re viewing, and where they’re coming from. This is useful for monitoring live campaigns or promotions.
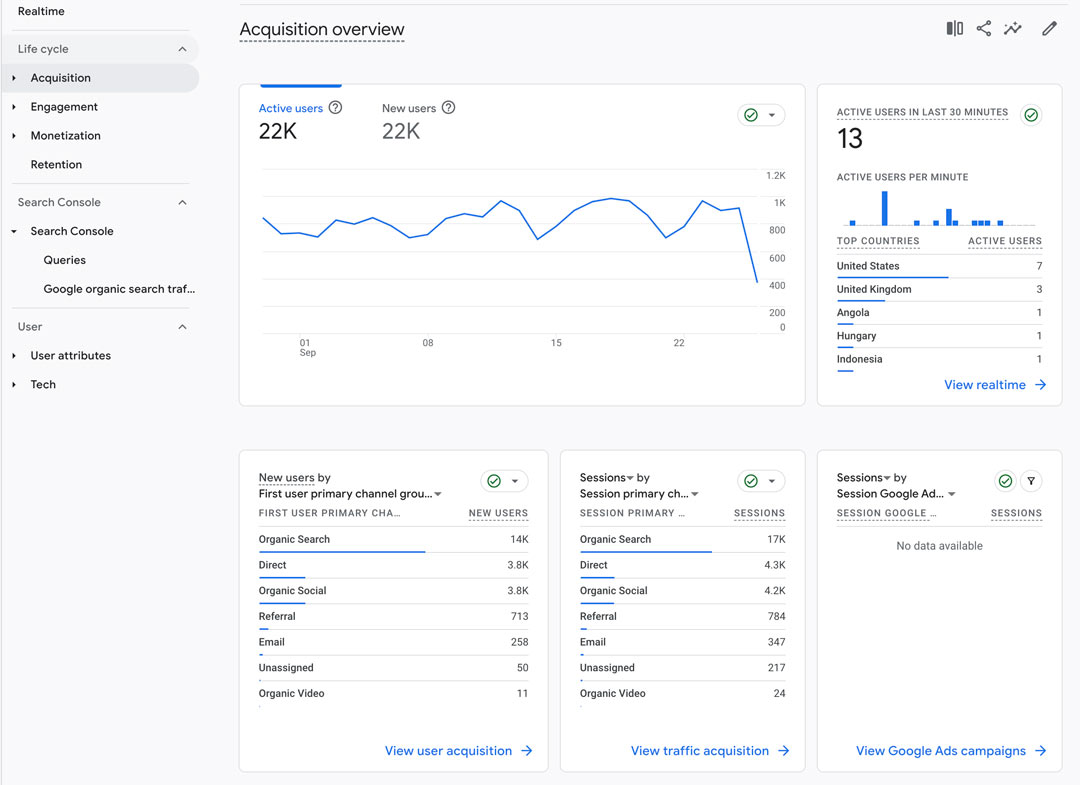
- Life Cycle:
- This is where you’ll spend most of your time. The “Life Cycle” section includes reports on Acquisition, Engagement, Monetization, and Retention. Each report gives you deeper insights into different aspects of your blog’s performance.
- Acquisition: Learn where your traffic is coming from, whether it’s organic search, social media, direct visits, or referrals.
- Engagement: See how visitors interact with your content, including page views, time on page, and events like downloads or video plays.
- Monetization: If you sell products or services, this section tracks your revenue and transactions.
- Retention: Understand how well you’re retaining visitors and turning them into repeat readers.
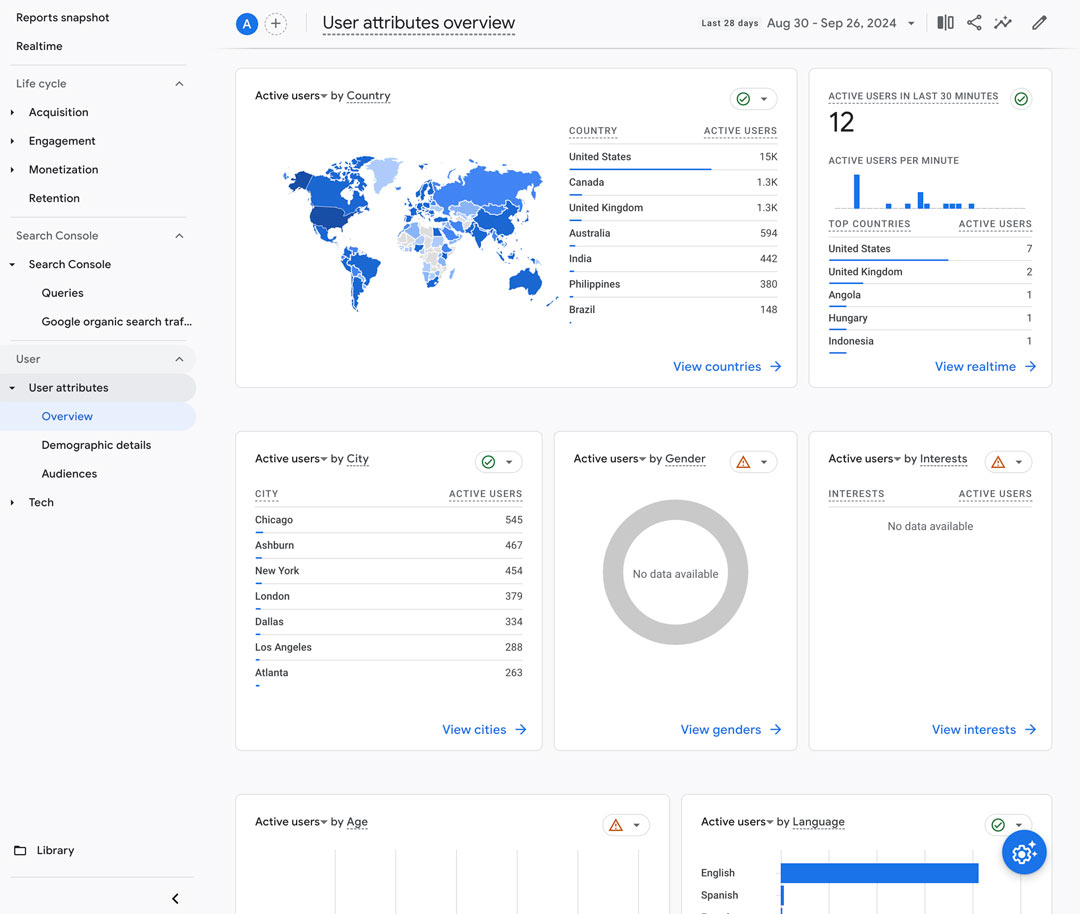
4. User:
The “User” section focuses on the demographics and behavior of your audience. You can see details like age, gender, location, and interests. This information helps you tailor your content to better meet the needs of your audience.
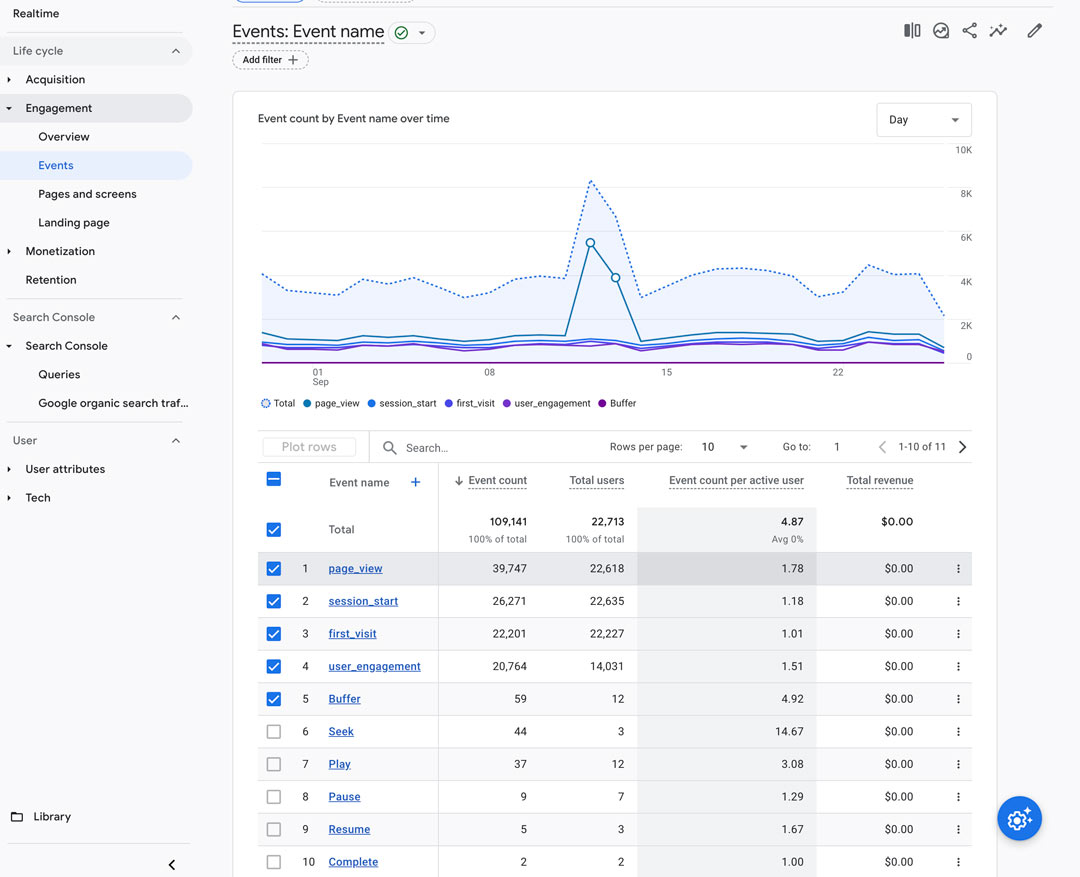
- Events:
GA4 tracks “events” rather than just page views. An event could be anything from a button click to a video play. This allows for more granular tracking and gives you a better understanding of how users interact with your blog.
Key Metrics to Monitor
Now that you’re familiar with the GA4 dashboard, let’s talk about the key metrics you should be paying attention to as a blogger:

- Users and New Users:
This metric tells you how many people are visiting your blog and how many of them are first-time visitors. It’s a good indicator of your blog’s reach and growth.
- Sessions:
A session is a group of user interactions within a given timeframe. Monitoring sessions helps you understand how often visitors return to your blog.
- Engagement Rate:
Engagement rate is the percentage of engaged sessions compared to total sessions. An engaged session is one where the user stays on your site for a significant amount of time, views multiple pages, or triggers certain events.
- Average Engagement Time:
This tells you how long, on average, visitors spend on your site. The longer they stay, the more engaged they are with your content.
- Traffic Sources:
Understanding where your traffic comes from (e.g., organic search, social media, direct) helps you optimize your marketing efforts. For instance, if you notice a lot of traffic from Pinterest, you might decide to focus more on that platform.
- Conversions:
If you have goals set up (such as signing up for a newsletter or purchasing a product), conversions track how well you’re achieving those goals. This is crucial for understanding the effectiveness of your blog’s calls to action.
Tips for Using GA4 to Grow Your Blog
Now that you know what to look for, here are some practical ways to use GA4 data to improve your blog:
- Optimize Your Top-Performing Pages:
Identify which pages are getting the most traffic and engagement. Focus on optimizing these pages further by improving the content, adding internal links, or placing call-to-action buttons.
- Refine Your Content Strategy:
Use the “User” section to learn more about your audience’s demographics and interests. Tailor your content to meet their needs and preferences.

- Track and Improve Conversions:
Set up conversion events in GA4 to track key actions on your site. Analyze which pages or sources lead to the most conversions and double down on those strategies.
- Identify and Reduce Bounce Rates:
Look at the engagement metrics to see which pages have high bounce rates (where visitors leave without interacting). Consider updating these pages with more engaging content or better calls to action.
- Experiment and Test:
GA4’s event tracking allows you to experiment with different elements on your site. Test different headlines, images, or call-to-action buttons and see what works best.
Conclusion
GA4 might seem complex at first, but once you get the hang of it, it’s an invaluable tool for growing your blog. By understanding and leveraging your analytics, you can make smarter decisions, create better content, and ultimately, build a more successful blog. Remember, the key is to start small, focus on the metrics that matter most to you, and use the insights you gain to continuously improve.
Google Analytics 4 (GA4) is a helpful tool that shows you how people use your website or app. With GA4, they can find out how many people go to their website, what things they like the most, where they come from, and how they discover it.
Additionally, GA4 can also tell you when users exit your website without completing significant actions such as making a purchase or signing up for your newsletter. You can separate visitors into different groups depending on what they do or how they act.
So, log in to your GA4 account, start exploring, and watch your blog thrive!
Frequently Asked Questions
GA4 is the latest version of Google Analytics, designed to provide a more user-centric approach to tracking data across devices and platforms. Unlike Universal Analytics, which focuses on sessions and pageviews, GA4 emphasizes events and user engagement. GA4 also includes enhanced tracking for user journeys, making it easier to understand how visitors interact with your site across multiple visits and devices.
As of today, no. Universal analytics already stopped tracking and reporting so there’s no use in having both tags up. It’s recommended to keep only GA4.
In GA4, events are any interactions users have with your website, such as clicks, page views, or form submissions. Unlike Universal Analytics, where you had to manually set up events, GA4 tracks many events automatically, like scrolls and outbound clicks. You can also create custom events to track specific actions relevant to your business goals.
Yes, GA4 allows you to create custom reports through the “Explore” section, where you can use the analysis hub to build detailed, customized reports. This feature offers more flexibility and depth than Universal Analytics, enabling you to drill down into specific data points and visualize your data in various ways.
More Blogging Posts To Read
If you enjoyed learning the Beginner’s Guide to Understanding Your Blog’s Analytics, you might also love these other blogging-related articles too:
- 7 Things Your Blog Needs to Improve and Optimize User Experience
- 7 Things to Increase Your Page RPM You can do today
- How to do a Website Audit to Improve SEO & Conversions
- Why You Should NOT be Using Third-Party Plugin Blocks in Blog Posts
Don’t forget to share and shave this post!


